Revit® Line Styles
In Revit we have two types of lines: model lines and annotation lines. In short, model lines can be modelled in any kind of view (plan, section, 3D etc.), and they will be visible in 3D (and in other views), hence the name “Model lines”. Annotation lines depend on a view they are drawn in, and they are visible only in that particular view (of course, they can be copied to other views as well), hence the name “Annotation lines”. Both, model and annotiation lines are members of the Revit category called Lines.
Line appearance is defined in the Line Styles tool. Each line style is a unique subcategory of the Revit Lines category. Managing lines in Revit is quite easy, using Object Styles tool or Visibility/Graphic Overrides tool we can turn lines on/off and change their appearance.
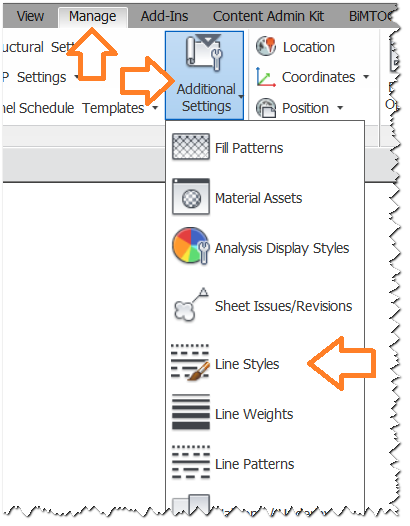
Line Styles tool can be run from the ribbon, choose Manage tab, then Additional Settings, and finally, option ![]() Line Styles:
Line Styles:

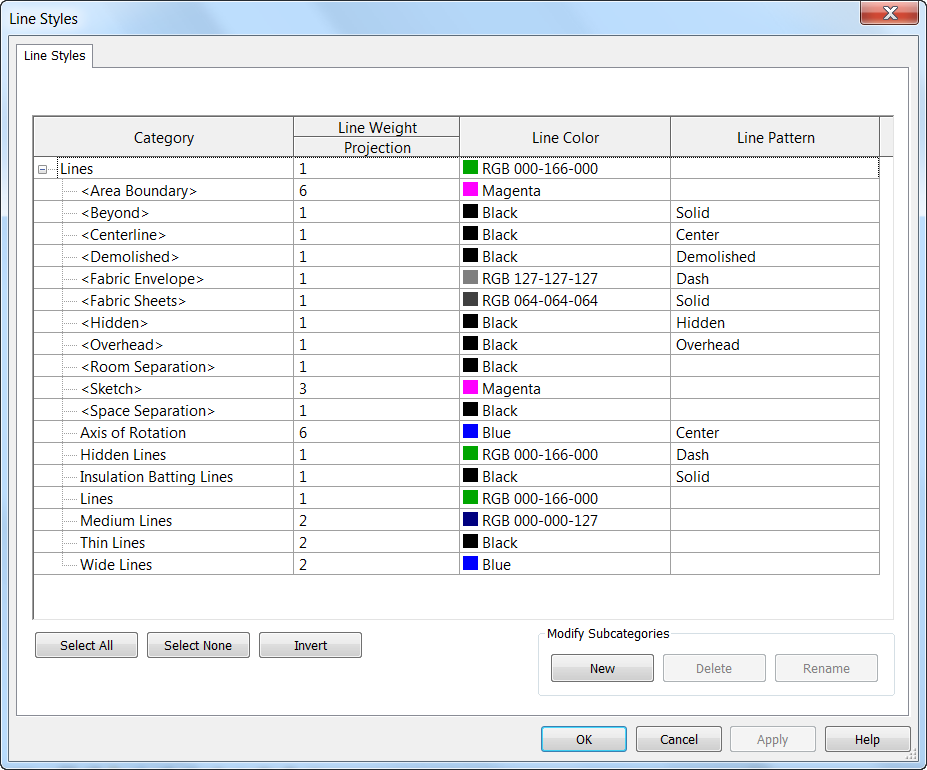
Then, Line Styles dialog will appear :

Revit Line Styles tool is very simple, it has a table with four columns in which are defined: name, weight, color and pattern of lines.
It is well known that Revit lines are made out of three basic ingredients (parameters):
- Line color
- Line weight
- Line pattern
Of course, to different one line of another, each line must have an unique name.
Tip: Line styles enclosed with < > characters are Revit system line styles with special purposes. We cannot delete or rename these line styles. Of course, we can change their style (color, weight and pattern), after all, that’s why they are here.
Also, there are some Revit line styles without < > characters which cannot be deleted or renamed. This is Revit basic set of “regular” lines.
Line styles displayed on the image above are Revit “basic line set”. These line styles will appear in every project because they are part of Revit core. Here is a list of Revit basic line set:
- {Area Boundary}
- {Beyond}
- {Centerline}
- {Demolished}
- {Fabric Envelope}
- {Fabric Sheets}
- {Hidden}
- {Overhead}
- {Room Separation}
- {Sketch}
- {Space Separation}
- Axis of Rotation
- Hidden Lines
- Insulation Batting Lines
- Lines
- Medium Lines
- Thin Lines
- Wide Lines
By clicking on the New button, we can define new line style. This action will create user defined style. We can rename, edit, or delete user defined styles.
After we click on the New button, all we need to do is define line style name. Afterwards, in the Line Styles table we define style of that new line style (color, weight and pattern).
When we model lines (Model Lines), or draw lines (Detail Lines), there is a dropdown menu in the ribbon where we can pick one of previously defined line styles (dropdown menu will display all of user defined styles and some of the Revit system line styles).
Tip: If we delete user defined line style, all the lines drawn with that style in Revit model will be translated into Revit basic style called “Thin Lines”. If we delete user defined line style, good news is that Revit will not delete lines that are modeled or drawn with that style.
Read also: REVIT LINE WEIGHTS, REVIT LINE PATTERNS

What about making a new Category of Line Styles, besides the given ‘Lines’?
I have been searching for this for hours, but can’t find a good answer to this. Is it just an obsolete part of Revit, and actually not possible? I saw a printscreen somewhere, where they had a category of lines called ‘Doors’ for example. This would be useful, for sorting the list.
Hi David! I am not sure I understand you question.
Every category can have additional (custom/user) subcategories, and they are managed in Object Styles dialog (or in Family editor).
“Line Styles” are not category but separate part of Object Styles dialog where you can adjust “object styles” for Lines category.
Or, to say in other words: there is no “Lines” category in Object Styles dialog because they are manage separately -> by using “Line Styles” dialog.
Confusing maybe, I know, but that’s how it is.
Regards
Pingback: Uzorci linija u Revit-u - engipedia